


Screen recording on iPhone is a built-in iOS feature that lets you capture everything happening on your display — with optional internal audio, microphone input, or a combination of both. Whether you’re showing a friend how to use an app, creating a tutorial, reporting a bug, capturing gameplay, or saving ephemeral content, the iPhone’s native screen recorder offers a simple and reliable method to create high-quality video clips directly from your device.
Before diving into the steps, the guide covers enabling the feature, recording with audio, using Focus Mode for clean captures, managing recordings, troubleshooting missing controls, and optimizing your setup across different iOS versions and iPhone models.
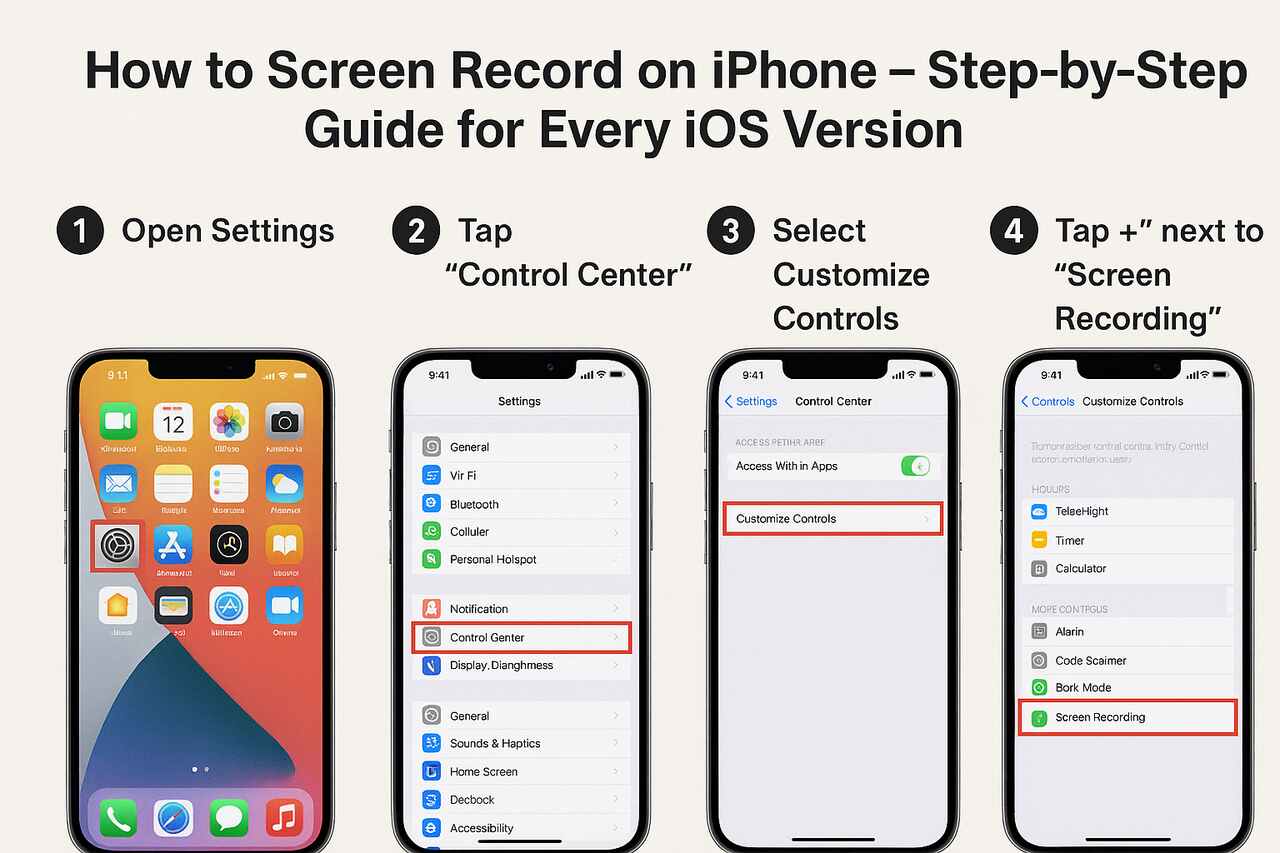
Enable Screen Recording in Control Center
The fastest way to start using screen recording is to add the Screen Recording control to the iPhone Control Center, which serves as the command hub for quick settings. This ensures the feature is instantly accessible with a swipe gesture, so you can start recording without navigating through menus. Once added, the control remains available across apps, Home Screen, and Lock Screen depending on your access settings.
Inside the Settings → Control Center menu, iOS displays two columns: “Included Controls” and “More Controls.” Screen Recording appears in the latter until you tap the + button to move it into the active section. Once added, you can drag the control to any position inside the Control Center list for quick access if you frequently record tutorials or demonstrations.
Enabling the control once is permanent across reboots, updates, and app changes, making this a one-time setup. If Screen Recording does not appear, the device may be running an older iOS version or operating under Mobile Device Management (MDM) restrictions from schools or workplaces.
Access Control Center to Begin Setup
Before recording, you must know how to open Control Center, because the recording toggle lives there. The gesture differs slightly by iPhone model, particularly between devices with Face ID and those with Touch ID. Understanding the correct motion ensures you can access the recording icon instantly in real-world tasks like capturing gameplay or documenting technical issues.
On modern iPhones (Face ID models), swipe down from the top-right corner of the screen where the battery icon appears. For older iPhones with Home buttons, swipe up from the bottom edge of the display. Once inside Control Center, you should see the circular Screen Recording icon, which turns from white to red when active.
Knowing both gestures is useful if you switch devices, lend your phone to someone else, or troubleshoot for friends and family. It also helps you avoid interrupting a recording by accidentally triggering the wrong gesture mid-capture.
Start Screen Recording from Control Center
Beginning a screen recording takes only a single tap. When you tap the circular Screen Recording icon, iOS triggers a three-second countdown so you can prepare the screen and avoid capturing the Control Center interface itself. When the countdown ends, the icon turns red and the recording begins immediately.
The capture includes everything displayed on the screen by default — app interactions, menu navigation, animations, and system gestures. This makes it ideal for producing app walkthroughs, bug reproduction steps, or educational clips demonstrating iOS features.
Once active, you’ll see a red indicator — either the status bar, the Dynamic Island glow (on newer models), or a red clock — confirming the session is live. This visible cue helps you verify that recording is working even when switching between apps or tasks.
Read Also: iPhone 14 Pro Max vs iPhone 15 Pro Max: A Comprehensive Feature Comparison
Record iPhone Screen with Internal or Microphone Audio
Recording audio is one of the most important capabilities for tutorials, gameplay commentary, or narrated explanations. iPhone allows two audio options: capturing internal system audio (what the phone plays) and using the Microphone to record your voice. You can use either mode individually or combine them depending on your needs.
To enable audio, long-press (or force-press) the Screen Recording icon in Control Center to open the audio settings card. Tap the Microphone icon at the bottom to toggle microphone input. When the mic is on, the icon turns red. Internal audio is captured automatically if the app being recorded allows it, though some apps block internal audio for privacy or copyright reasons.
Using microphone audio is helpful for live commentary, voice-over explanations, or capturing external environmental sounds. Meanwhile, internal audio is preferred for gameplay, app demonstrations, or capturing sound from social media apps. The combination of both provides a flexible workflow for content creators, educators, and support technicians.
Stop the Screen Recording Safely
Stopping a recording can be done instantly using two system controls. The quickest option is to tap the red status bar (or the red Dynamic Island indicator on newer models) and confirm by tapping Stop. This ends the recording and saves the video automatically to the Photos app.
Alternatively, you can reopen Control Center and tap the Screen Recording icon again to stop the capture. This method avoids triggering on-screen prompts in the video, which is helpful when you want the end of your recording to look clean for professional use.
Once stopped, iOS finalizes the video, compresses it, and stores it locally. If the recording is long, the finalization step may take a few seconds before it appears in the Photos library.
Locate the Saved Screen Recording in the Photos App
After completing a recording, iPhone automatically stores the video in the Photos app, where system albums help you quickly locate recent captures. You can find recordings in Photos → Albums → Media Types → Screen Recordings or simply in the Recents or Videos sections.
The Videos viewer allows you to trim the beginning or end, crop the frame, adjust exposure, add filters, or edit the sound levels. Many users rely on this native editor to produce polished clips without needing a third-party app. The Photos app also enables copying the video, creating GIFs, and exporting at reduced file sizes for messaging or email.
For large recordings, iCloud Photos syncs the clip across your Apple devices, making it easier to edit on a Mac or iPad if preferred.
Troubleshoot a Missing Screen Recording Button
If the Screen Recording control is not visible in Control Center, the issue usually lies within the Settings → Control Center configuration. Adding it manually typically solves the problem immediately. Tap the green + icon next to “Screen Recording” under More Controls to activate it.
However, you may encounter cases where Screen Recording is intentionally disabled. Devices configured by workplaces, schools, or organizations may use MDM restrictions that block screen capture for security reasons. For personal devices, enabling Screen Time restrictions under Content & Privacy can also hide or disable the feature.
Older iPhones running pre-iOS-11 software do not support native screen recording at all, so updating the device is required. Additionally, some individual apps — especially streaming, banking, or rights-protected platforms — may block recording inside the app even if the system feature works elsewhere.
Verify Compatibility Across iPhone Models and iOS Versions
Screen Recording is supported on all iPhones with iOS 11 and later, making it compatible with a wide range of devices from the iPhone 5s/SE era to modern models such as iPhone 15. While the gesture for opening Control Center differs (swipe down vs. swipe up), the recording workflow and results remain consistent.
Older devices may show slightly lower frame rates or longer processing times for large captures, especially when recording fast-moving content like gameplay. Newer devices with A14, A15, A16, and A17 chips handle high-resolution internal audio recording with excellent stability.
Compatibility considerations also apply to app restrictions; some apps simply refuse to allow screen capture for privacy or copyright reasons. In these situations, recordings may appear blank or audio-less.
Here’s a comparison table summarizing compatibility:
| iPhone Model | iOS Version Required | Supported Features |
|---|---|---|
| iPhone 5s / SE (1st gen) | iOS 11+ | Basic recording, mic support |
| iPhone 6 / 6s / 7 / 8 | iOS 11–15 | Screen + mic audio, standard resolution |
| iPhone X / XS / XR | iOS 11+ | Higher resolution, Dynamic Island absent |
| iPhone 11 / 12 / 13 | iOS 13+ | Better stabilization + stereo audio |
| iPhone 14 / 15 | iOS 16–17 | High-res, improved audio, Dynamic Island indicator |
Create Clean, Professional-Looking Screen Recordings
Before starting, it’s beneficial to prepare your iPhone for a clean recording free from distractions like notifications, pop-up alerts, or personal messages. Activating Focus Mode (or Do Not Disturb) is one of the simplest ways to maintain a distraction-free environment. This avoids capturing unwanted interruptions that could appear during a demonstration or professional tutorial.
Another detail is hiding sensitive UI elements such as the status bar, navigation overlays, or the Dynamic Island glow. While you can’t fully remove these elements during recording, you can crop them out later using Photos or a video editor. Some apps also support full-screen or presentation mode for cleaner recordings.
Creators producing high-quality content often disable background apps, clear cluttered Home Screens, or switch to a special “recording” Focus profile that hides notifications and incoming calls.
Edit and Export Your Screen Recording for Sharing
Once the video is saved in Photos, you can enhance it using the built-in editor. Trimming the start and end points helps eliminate moments when the Control Center appears or when you pause before demonstrating an action. Cropping adjusts the frame to emphasize app elements or remove sensitive information like the Dynamic Island.
Photos also supports adjusting brightness, sharpness, volume levels, and applying color filters for consistency. Once edited, export options include Messages, Mail, AirDrop, Files, and third-party apps like YouTube, Instagram, or TikTok. You can also compress using “Save As Video” or “Save to Files” and choose smaller export settings for easier uploading.
Creators who need even more control can export the video to iMovie, Final Cut Pro (on Mac), or third-party video editors such as CapCut, LumaFusion, or DaVinci Resolve.
Use External Accessories and Special Recording Tools
Advanced users may attach external microphones, wired headsets, or wireless Lavalier mics to capture higher-quality voice audio during recording sessions. These accessories typically appear as input devices in iOS, allowing the Screen Recording feature to capture clearer vocal audio.
Stylus-based interactions, such as using an Apple Pencil on an iPad (when using similar workflows), provide a more professional demonstration for education or app walkthroughs. Screen mirroring to a Mac and recording via QuickTime Player is another powerful option for presenters, especially when they need keyboard shortcuts or live commentary.
Some applications block screen mirroring or screen recording entirely due to Digital Rights Management (DRM), which is expected behavior and not a malfunction of the recording system.
Best Practices and Practical Real-World Use Cases
Successful screen recordings rely on a combination of preparation, steady pacing, and clean visuals. Many educators, support agents, and content creators pre-plan their steps to avoid fumbling through menus on camera. Slow, deliberate gestures look better in playback and help teach viewers clearly.
Common real-world uses include recording app tutorials for coworkers, documenting bugs for tech support, showing family members how to use iPhone features, capturing gameplay for social media clips, and gathering evidence of issues like unexpected app behavior or website errors.
Because recordings can contain sensitive or personal information, always check surroundings and disable notifications before sharing a clip publicly. Privacy considerations matter greatly in professional settings where confidential data may appear briefly during a demonstration.
Post-Recording Workflow Comparison
| Workflow Goal | Recommended Method | Tools / Apps |
|---|---|---|
| Quick trim + share | Trim in Photos app | Photos |
| Add music or voice-over | iMovie or CapCut | iMovie, CapCut |
| Professional editing | Mac transfer + Final Cut Pro | AirDrop, Mac |
| File compression | Export via Files | Files app |
| Creating GIFs | Convert in Photos or third-party | Photos, GIPHY, Shortcuts |
Conclusion
Learning how to screen record on iPhone unlocks a versatile, powerful tool for tutorials, troubleshooting, education, and content creation. By enabling the Screen Recording control in the Control Center, mastering audio options, using Focus Mode for clean captures, and applying post-editing techniques, users can produce polished and professional videos directly from their device. iOS makes the process intuitive across all supported iPhone models, ensuring consistent performance and high-quality output for both personal and professional needs.
FAQ
Do all iPhones support screen recording?
Yes. Any iPhone running iOS 11 or later includes the native Screen Recording feature.
Why don’t I see the Screen Recording button in Control Center?
Because it has not been added yet. Go to Settings → Control Center and tap the + next to Screen Recording.
How do I record my iPhone screen with audio?
Open Control Center, long-press the recording icon, and tap the Microphone button to enable external audio. Internal audio works automatically in supported apps.
Where are iPhone screen recordings saved?
Recordings save automatically to Photos → Albums → Media Types → Screen Recordings or the Recents and Videos sections.
Can I stop a screen recording immediately?
Yes. Tap the red status bar or Dynamic Island indicator, then tap Stop. Or reopen Control Center and tap the icon again.
Why do some apps show a blank screen in recordings?
Some apps — especially streaming, banking, or rights-protected apps — restrict screen capture for security or copyright reasons.
How do I make clean recordings without notifications?
Enable Focus Mode or Do Not Disturb, close background apps, and crop out the status bar during editing if needed.
Also Check: Beats Studio Buds vs. AirPods Pro: Which Wireless Earbuds Dominate?


