


Screen recording on macOS is a built-in capability designed to capture everything happening on your display with minimal setup. Whether you create tutorials, demonstrate software, record presentations, or document bugs, macOS provides native tools that are fast, secure, and deeply integrated with the system. This guide walks through every method step by step, explains audio options, compares tools, and solves common problems so you can record with confidence and professional results.
What is screen recording on a Mac?
Screen recording on a Mac captures visual activity displayed on your screen into a video file. The operating system records windows, menus, cursor movements, and optional audio into formats such as MOV or MP4 for easy playback and sharing.
This capability relies on macOS system frameworks that prioritize performance and privacy. The recording process uses hardware acceleration when available, which keeps CPU usage lower than many third-party tools. Recordings save automatically to your Mac or a chosen destination.
Screen recording supports multiple workflows. Educators use it to explain lessons, professionals use it to demonstrate software, and support teams rely on it to reproduce issues. The feature adapts to simple and advanced needs depending on the tool you choose.
Why would you want to screen record on a Mac?
Screen recording allows you to communicate visually instead of relying on long explanations. A short recording can replace pages of documentation or dozens of screenshots.
macOS integrates recording with sharing tools like AirDrop, Messages, and cloud storage. This integration speeds up collaboration, especially for remote teams and online learning environments.
Different audiences benefit in different ways. Educators create instructional videos, gamers capture gameplay, and professionals record presentations with narration. Screen recording becomes a productivity multiplier across industries.
Is screen recording safe and secure on macOS?
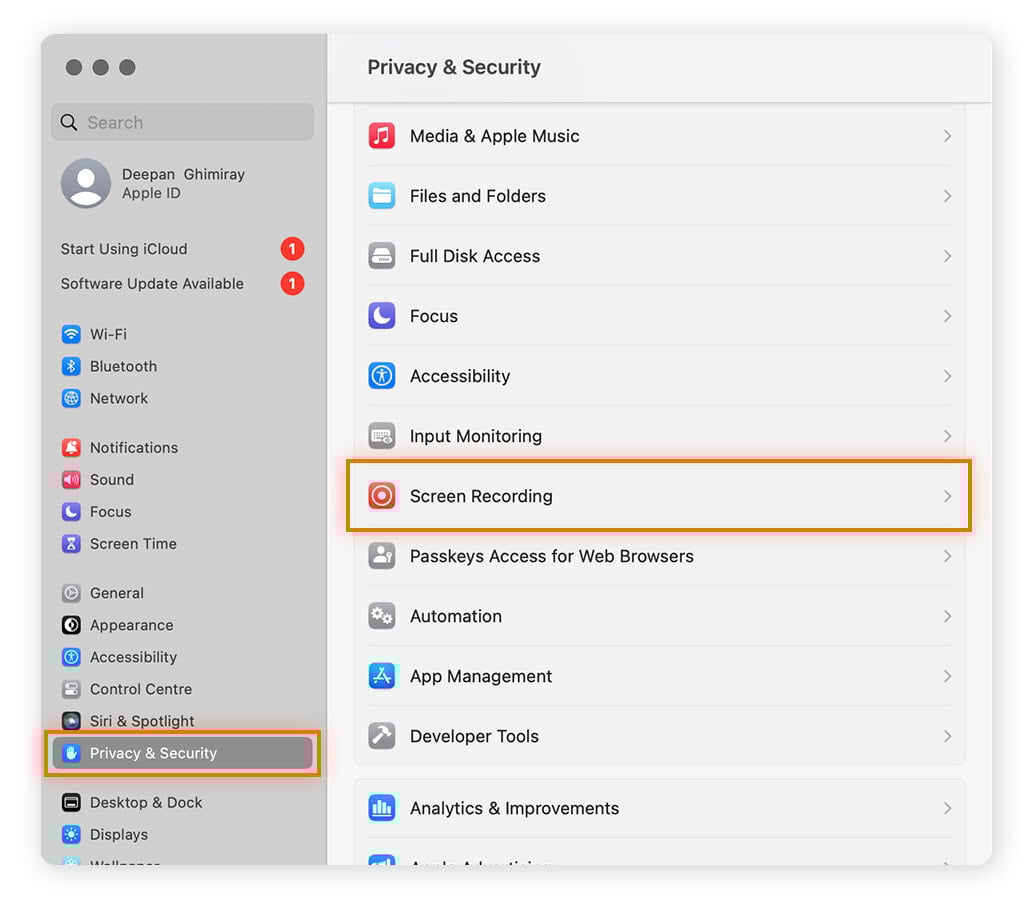
macOS enforces strict permission controls for screen recording. Applications must request explicit approval before capturing your screen, and you can revoke access at any time in System Settings.
The operating system isolates recordings to prevent unauthorized access. Only apps you approve can capture content, and system alerts notify you when recording starts.
Apple’s privacy model ensures sensitive information remains protected. This design makes macOS screen recording suitable for professional and enterprise environments where security matters.
What’s the difference between screen recording and screenshots?
Screen recording captures continuous motion and audio over time, while screenshots capture a single static frame. Videos show processes, interactions, and workflows that images cannot fully explain.
Screenshots are lightweight and quick, ideal for documentation. Screen recordings are larger files but provide richer context and clarity.
Choosing between them depends on your goal. If you need to demonstrate steps or timing, screen recording is the better option.
How do you screen record on Mac using the built-in Screenshot toolbar?

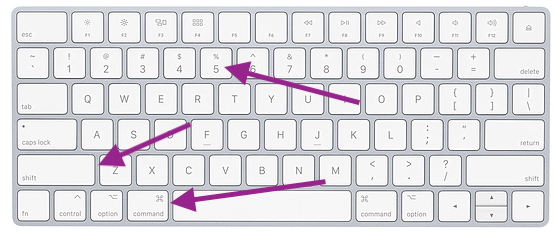

The macOS Screenshot Toolbar provides the fastest way to record your screen. Press Command + Shift + 5 to open the toolbar, then select Record Entire Screen or Record Selected Portion.
After choosing your area, click Record. A stop button appears in the menu bar while recording. When finished, click Stop to save the video automatically.
The toolbar includes options for saving location, timer delay, and audio input. This flexibility makes it ideal for quick recordings without extra software.
How to show mouse clicks and cursor during recording?
macOS records the cursor by default. To emphasize clicks, enable visual click indicators in accessibility settings or use third-party utilities designed for tutorials.
Clear cursor visibility improves instructional videos. Adjust cursor size and contrast in System Settings for better on-screen clarity.
This approach helps viewers follow actions precisely, especially during software demonstrations.
How to include microphone audio with your screen recording?
Open the Screenshot Toolbar options and select a microphone source. macOS supports built-in and external microphones.
Test audio levels before recording to avoid distortion. A short test recording ensures clarity and balanced sound.
Narration adds context and value, making recordings more engaging and easier to understand.
How to screen record on Mac using QuickTime Player?


QuickTime Player offers a straightforward recording workflow. Open the app, select File, then New Screen Recording.
Click the arrow next to the record button to choose microphone input. Start recording the full screen or drag to select a portion.
QuickTime saves recordings in MOV format. This format preserves quality and works seamlessly with macOS editing tools.
How to record full screen vs selected area in QuickTime?
Click anywhere to record the full display. Drag to select a specific area for focused recordings.
Area selection reduces file size and highlights relevant content. This option is useful for tutorials centered on one application.
QuickTime’s simplicity makes it ideal for beginners and quick tasks.
How to record internal system audio on Mac?
macOS does not natively record internal system audio due to privacy policies. To capture system sound, you need a virtual audio driver.
Tools like OBS Studio or Loopback route system audio into a recordable source. Setup involves selecting the virtual device as an audio input.
This method enables recording app sounds, music, and notifications. It is essential for gameplay and software demos with sound effects.
How to record webcam and screen at the same time (picture-in-picture)?
Picture-in-picture recording overlays a webcam feed on your screen capture. Third-party tools handle this best.
ScreenFlow provides built-in layouts and resizing controls. OBS Studio offers advanced scene composition for full customization.
This format is popular for tutorials and presentations because it adds a personal connection.
What to do if screen recording won’t start on Mac?
Check screen recording permissions in System Settings under Privacy & Security. Ensure the app has approval.
Restart the app or Mac if permissions changed recently. macOS often requires a restart to apply updates.
Storage space also matters. Ensure sufficient free space to save recordings.
How to reduce file size when screen recording on Mac?
Lower resolution and frame rate reduce file size significantly. Most tutorials look fine at 1080p and 30 fps.
Choose efficient codecs like H.264 or HEVC when exporting. These balance quality and compression.
Trim unnecessary sections before sharing. Shorter videos are easier to upload and view.
Why isn’t macOS recording system audio and how to fix it?
System audio capture requires third-party solutions. macOS blocks native recording for privacy reasons.
Install a trusted virtual audio driver and configure your recording app to use it.
This setup unlocks full audio capture while maintaining system security.
What are the best third-party screen recording apps for Mac?


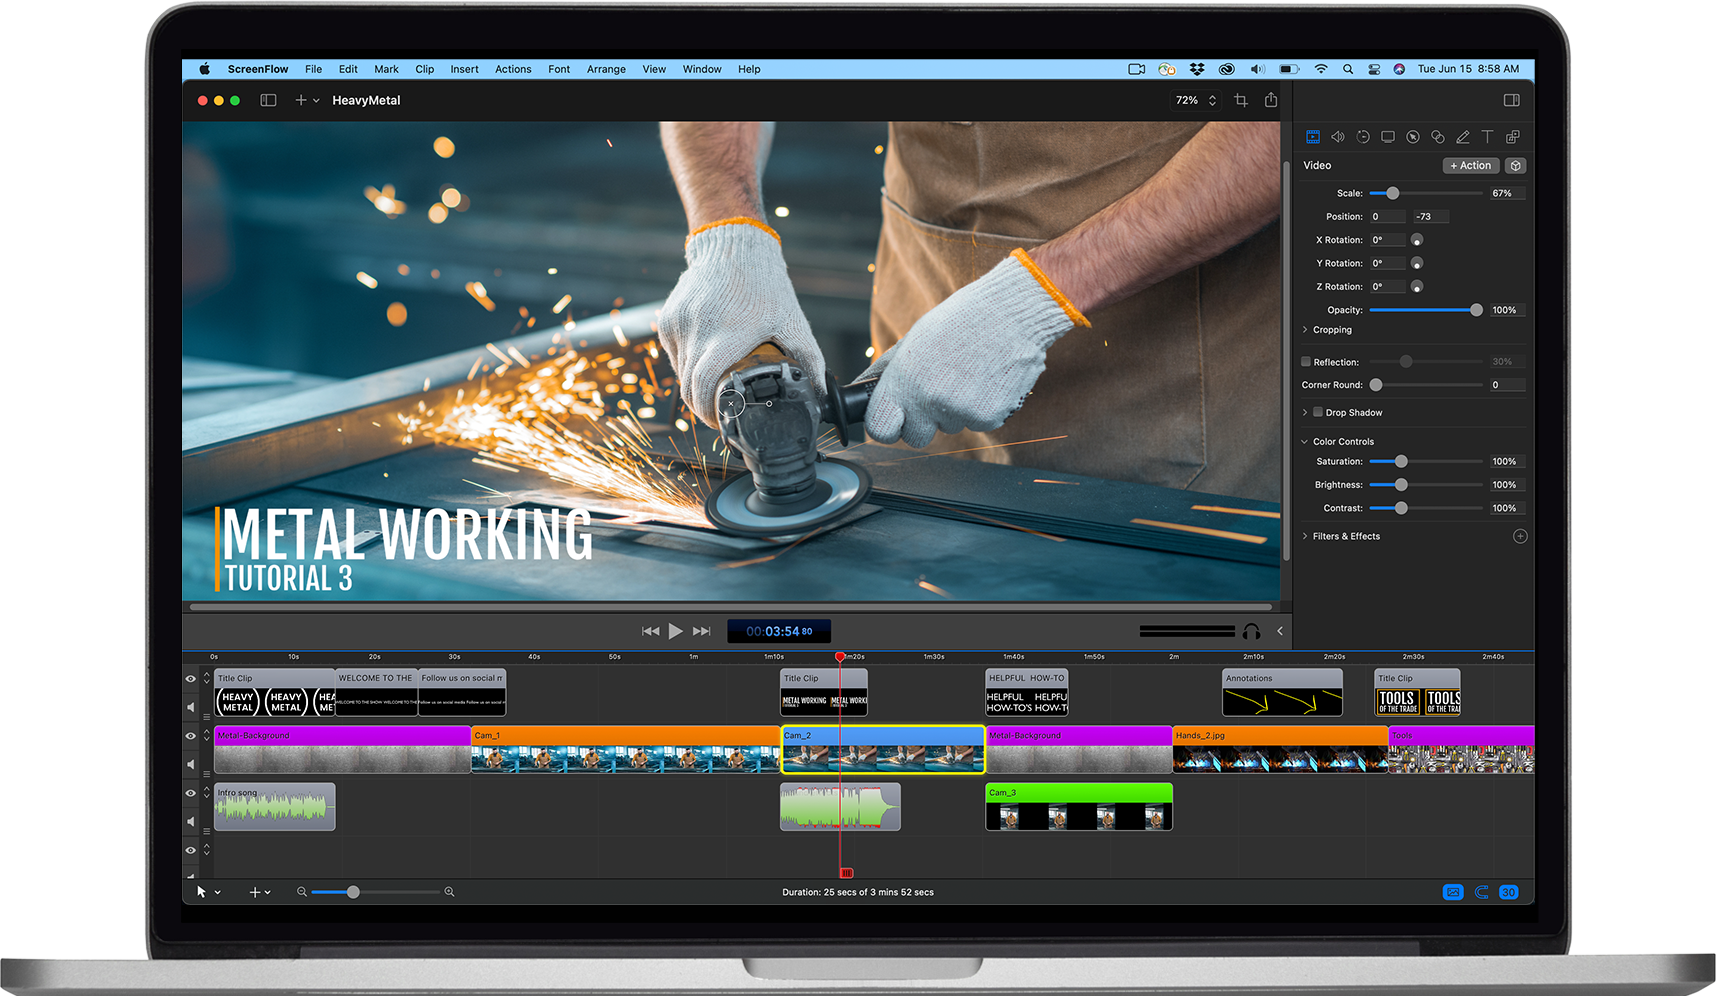
Third-party apps extend macOS capabilities with advanced features. OBS Studio is free and highly customizable. ScreenFlow offers an all-in-one recording and editing environment.
Other tools focus on simplicity or cloud sharing. Your choice depends on workflow and experience level.
Professional creators often prefer tools with built-in editors and audio controls.
How does OBS Studio compare to ScreenFlow for screen recording?
OBS Studio excels at customization and live streaming. ScreenFlow focuses on ease of use and post-production.
OBS suits technical users who want control. ScreenFlow suits educators and marketers who want speed.
Both support high-quality output and multiple audio sources.
Is QuickTime or Screenshot toolbar better for beginners?
The Screenshot Toolbar offers the fastest access. QuickTime provides slightly more control over recording initiation.
Beginners benefit from the toolbar’s simplicity. QuickTime is better for users who prefer an app-based workflow.
How do you edit and share your Mac screen recordings?
macOS includes basic editing in QuickTime and Photos. Trim clips, split segments, and adjust playback.
For advanced edits, use iMovie or professional editors. Export in formats optimized for your platform.
Sharing options include AirDrop, email, and cloud services.
How to upload screen recordings from Mac to YouTube, Google Drive, or social media?
Export videos in MP4 for maximum compatibility. Most platforms accept this format without conversion.
Log in to the platform, upload the file, and add titles and descriptions. Optimized metadata improves discoverability.
Stable internet ensures faster uploads and fewer errors.
Can you screen record on Mac without showing the Dock or menu bar?
Hide the Dock and menu bar in System Settings before recording. Full-screen apps also conceal interface elements.
This approach creates clean, distraction-free videos. It is ideal for presentations and tutorials.
Restoring settings afterward returns normal behavior.
How to screen record with external monitors connected?
macOS allows selecting specific displays in recording tools. Choose the monitor you want to capture.
External displays work seamlessly with built-in and third-party tools. Ensure resolution settings match your output goals.
This flexibility supports multi-monitor workflows and professional setups.
Conclusion
Screen recording on Mac combines simplicity, security, and flexibility. Built-in tools handle quick captures, while third-party apps unlock professional workflows. By choosing the right tool, configuring audio properly, and optimizing settings, you can create clear, effective recordings for any purpose.
Frequently Asked Questions
How do I start screen recording on my Mac?
Press Command + Shift + 5 and select a recording option.
Can I record internal audio on macOS natively?
No, system audio requires third-party solutions.
Where does macOS save screen recordings?
By default, recordings save to the Desktop unless changed.
Can you edit screen recordings on Mac without extra software?
Yes, QuickTime and Photos offer basic editing tools.
What’s the best frame rate for screen recordings?
Thirty frames per second balances smooth motion and file size.
Can I record my webcam while capturing my screen?
Yes, third-party apps support picture-in-picture recording.
Related Article: How to Screen Record on iPhone – Step-by-Step Guide for Every iOS Version


